Build a quick and private online converter
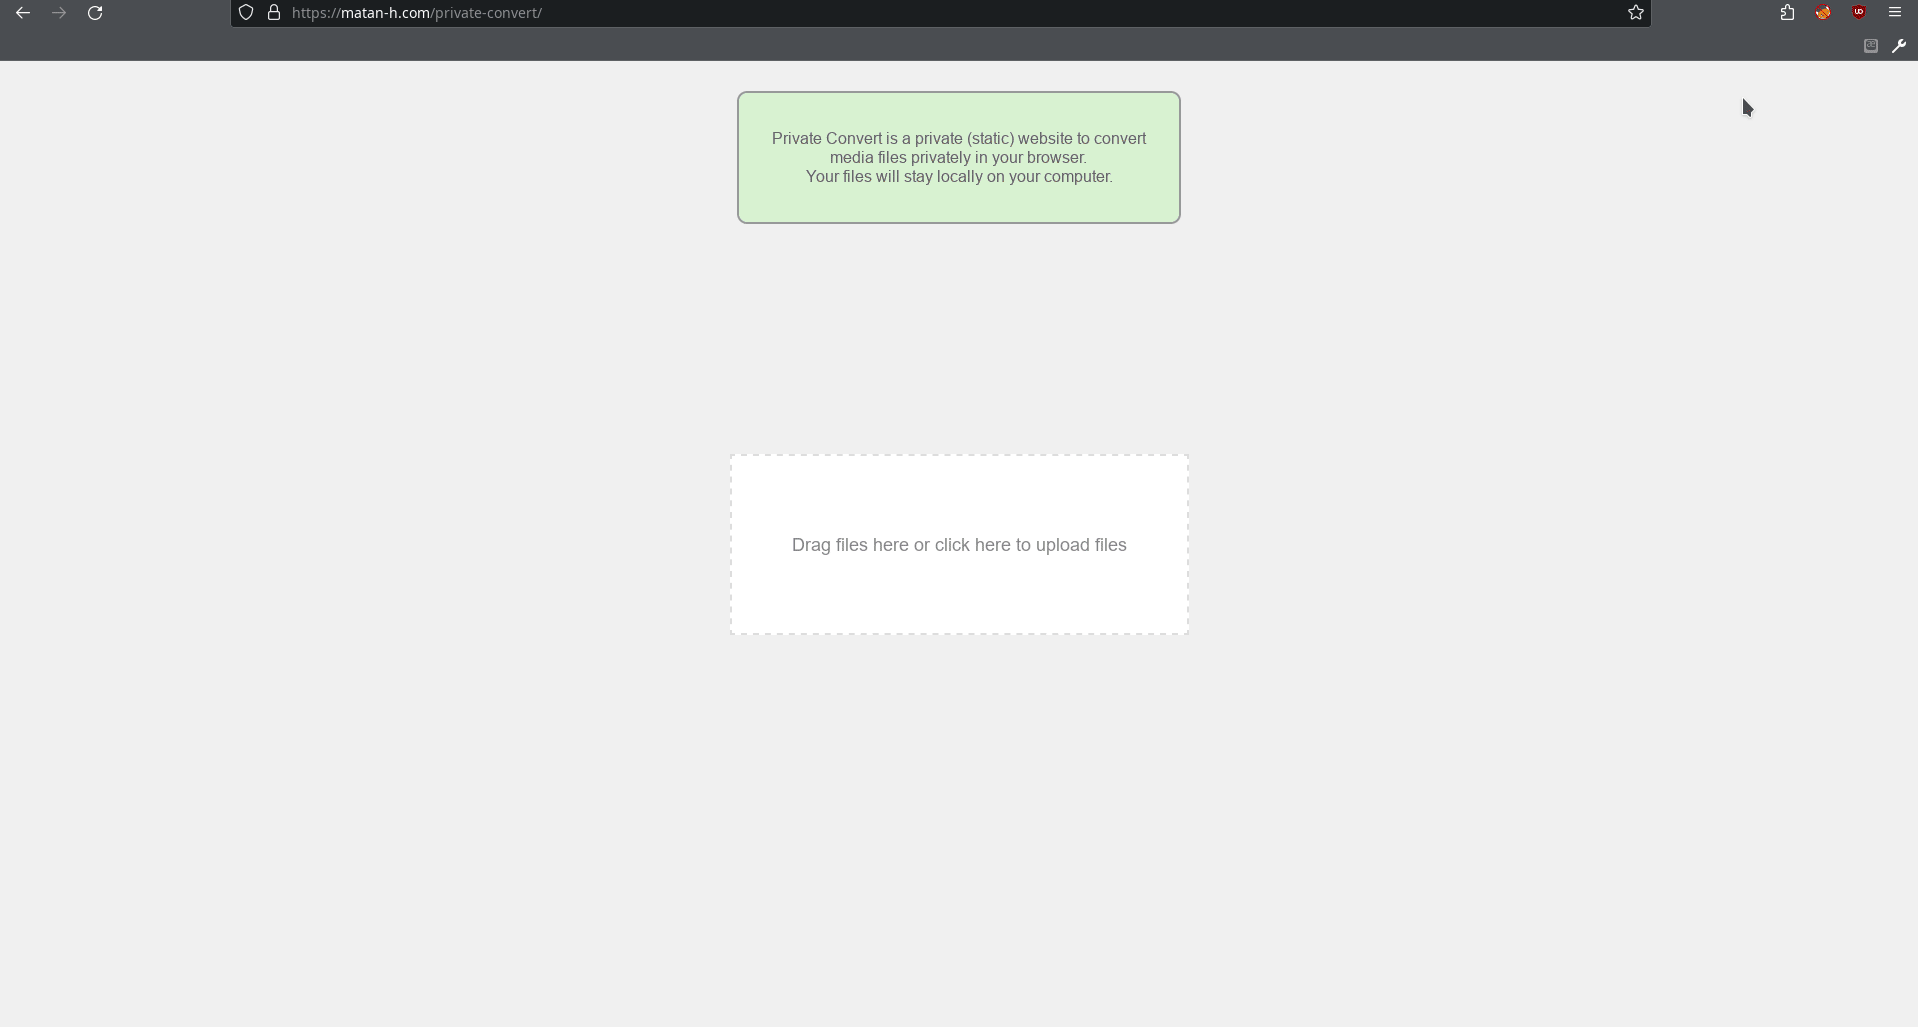
It happens a lot that I need a media converter: for example, to convert mp4 to GIF, that I can send on WhatsApp.
What most people do is just search google for “mp4 to GIF online converter” and get a lot of sites that are either full of trackers and keep your data, or force you to create an account.
But the real problem began after I had a larger mp4, then most converters wouldn’t even let me upload, and those who do, have a very long upload time. So I was forced to use ffmpeg (FF MPEG command-line program to convert media), which is not a bad program, it’s just unintuitive (or has unintuitive defaults) to the level that instead of searching for an online converter I was searching “FFmpeg command mp4 to GIF” (the default is ffmpeg -i inp.mp4 out.gif, which just puts each frame of the mp4 inside the GIF, so for 3.6 mb mp4 file I get 74 mb GIF …)
So I built my own online converter.
building the converter
why serverless
There are two approaches for conversion websites:
-
The client upload the files to the server, it runs FFmpeg on each of them in a safe and orderly manner, and returns the output.
-
The client uploads the files to the
javascripton the website, and the JavaScript converts the files locally in the browser of the client. In this case, the server is used just to serve the HTML and JavaScript file (serverless).
In most cases of conversion, the first approach is the only approach that is possible, and this is the approach you see in google results.
| server (1) | serverless (2) |
|---|---|
| can be used without JavaScript/ using API | Relies on the user’s latest browser |
| has upload-time | doesn’t have upload time, but longer processing time. |
| has a hard size limit | there is no limit, and the maximum size is set by the client computer |
| needs a lot of work to secure the server (for example, it may be easy to DOS, using a lot of maximum size files) | no worries about server security and no rate limiting or maximum number of files a user can upload |
| It’s really hard to become private. | fully private - there is no server with your sensitive files. |
| Expensive (Processing power) | cheap/free (it’s just an HTML file) |
Since I moved recently from WordPress to jekyll (from full server to serverless), as you can guess, I choose the serverless approach.
FFmpeg
There is something special regarding media conversion sites: most of them use the same open source tool, just with different frontend and options. This awesome tool is called FFmpeg (or Fast Forward Moving Picture Experts Group), and it’s written in c.
But there is one problem. How to run this serverless? You can’t just run c code on a browser and expect it to work. But with WebAssembly, it’s possible. Still, the FFmpeg code is not really WAsm-compatible.
But someone ported FFmpeg (using Emscripten) to WebAssembly, and created the awesome ffmpeg.wasm and even created a JavaScript/typescript interface for it.
So, after we know how FFmpeg can run in the client browser, let’s get started.
start the project
spoiler: the converter is online at this site at /private-convert
Let’s start the project. I want to leverage the typescript interface that ffmpeg.wasm has, so I use create-react-app from Facebook:
yarn create react-app my-converter --template typescript
The first thing you need is an interface. I don’t really like designing everything from scratch, so I used ChatGPT/Bard to write a simple interface. They wrote a lot of code (you can look at it in this commit), but here is the important code:
enum Screen {
  UPLOAD,
  PREVIEW,
  CONVERTING,
  CONVERTED
}
const App: React.FC = () => {
  const [currentScreen, setCurrentScreen] = useState<Screen>(Screen.UPLOAD);
  const [selectedFiles, setSelectedFiles] = useState<FileList | null>(null);
  const [convertedFile, setConvertedFile] = useState<File | null>(null);
  const [conversionProgress, setConversionProgress] = useState<number>(0);
...
  const handleReset = () => {
    setSelectedFiles(null);
    setConvertedFile(null);
    setConversionProgress(0);
    setCurrentScreen(Screen.UPLOAD);
  };
  const handleConvert = () => {
    setCurrentScreen(Screen.CONVERTING);
    simulateConversion(); // Placeholder for actual conversion logic
  };
  const renderScreen = () => {
    switch (currentScreen) {
      case Screen.UPLOAD:
        return (<input type="file" multiple onChange={handleFileUpload} />)
      case Screen.PREVIEW:
        return (
          <div className="content">
            {/* Display preview of uploaded files */}
            <select className="dropdown">
              {/* Dropdown for "convert to" options */}
            </select>
            <button className="action-button" onClick={handleReset}>Reset</button>
            <button className="action-button" onClick={handleConvert}>Convert</button>
        )
      case Screen.CONVERTING:
        return (<p>Converting...</p>)
      case Screen.CONVERTED:
        return (<button className="action-button">Download</button>)
The code defines 4 states the site can be on:
-
upload- where the user uploads the file -
preview- where the user chooses which format they want as a target -
processing (
converting) - a ProgressBar while the file is being processed -
download (
converted) - where the user can download the converted files.
Great. Now we have an interface, and we can continue to the interesting part : the conversion.
The Conversion
There are two versions of ffmpeg.wasm, the multi-thread (called @ffmpeg/core-mt) and the single-threaded (called @ffmpeg/core). Sometimes Chromium-based browsers do not support multi-thread. The single-threaded works on all browsers, but it’s much slower compared to the multithreaded version. So let’s load the multithreaded version only on Firefox. Here is the load function: (this file is also here)
import { FFmpeg as FFmpegCore } from "@ffmpeg/ffmpeg";
import { toBlobURL, fetchFile } from "@ffmpeg/util";
class ffmpegCls {
...
  async load(): Promise<void> {
    let is_firefox = navigator.userAgent.toLowerCase().includes('firefox');
    let core_path = is_firefox ? "core-mt" : "core"
    const base_url =  `https://unpkg.com/@ffmpeg/${core_path}@0.12.2/dist/umd`
    console.log("loading ffmpeg from",core_path,"is_firefox:",is_firefox)
    let coreblob = await toBlobURL(
      `${base_url}/ffmpeg-core.js`,
      "text/javascript",
    )
    let wasmblob = await toBlobURL(
      `${base_url}/ffmpeg-core.wasm`,
      "application/wasm",
    )
...
    await this.ffmpeg.load({
      coreURL: coreblob,
      wasmURL: wasmblob,
      workerURL: workerblob
    });
    this.loaded = true;

  }
Which loads the correct WAsm version based on the browser.
Let’s also define a function to run the FFmpeg command:
  async exec(inputFileName: string, OutputMimeType: string, inputBlob: string, outputFile: string, args: string[]): Promise<File> {
...
    await this.ffmpeg.writeFile(inputFileName, await fetchFile(inputBlob));
    const commandList = ["-hide_banner", "-i", inputFileName, ...args, outputFile].filter(el => (el !== '')) // remove empty strings
    console.log(`running ffmpeg command [${commandList}]`)
    await this.ffmpeg.exec(commandList);

    const data = await this.ffmpeg.readFile(outputFile);
    const blob = new Blob([data], { type: OutputMimeType });
    return new File([blob], outputFile, { type: OutputMimeType })
  }
Good. Now we have class to load FFmpeg, and a function that runs commands on an input file and gets an output file. But the exec function we defined takes some parameters we don’t know:
-
inputFIleName,inputBlob, OutputFile- we know. The input is what the user supplied and the output just replaces the extension. -
OutputMimeType- we need a map{ext_format: mimetype} -
args- we need a map{conversion_type: args}
OutputMimeType is necessary so that the browser knows how to save and display it, and args is necessary to change the default behavior of FFmpeg because otherwise we will have things like 74 mb GIF from 3.6 mb MP4.
The map
Let’s define the convert option:
export interface ConvertOption {
  extension: string; // for example "mp4"
  mimetype: string; // for example "video/mp4"
  full_string: string; // for example "MPEG-4 Video"
  optional_convert_routes: ConvertRoutes; // for example: {mkv: ["-vcodec","copy"]}
}
then, we can define the “standard/normal FFmpeg args” for most video formats:
interface ConvertRoutes {
  [format: string]: string[];
}
const normalVideoRoutes_video: ConvertRoutes = {
  mp4: [],
  mkv: ["-vcodec","copy"],
  avi: [],
};
and finally write the map (you can look on the full map at this file):
interface ConvertOptionsType {
  [extension: string]: ConvertOption;
}
export const ConvertOptions: ConvertOptionsType = {
  // -- video
  mp4: {
    extension: "mp4",
    mimetype: "video/mp4",
    full_string: "MPEG-4 Video",
    optional_convert_routes: normalVideoRoutes,
  },
  mkv: {
    extension: "mkv",
    mimetype: "video/matroska",
    full_string: "Matroska Video",
    optional_convert_routes: copyWith(normalVideoRoutes, {
      mp4: ["-codec","copy"],
    }),
  },
I added some more features (for example, multi-files, FFmpeg logs). You can look at the final App.tsx on my GitHub, or just enjoy it right now: online at /private-convert
I hope you enjoy it and if you have any Idea how to make it better, let me know in the comment section, or just with issue or pull request to the private-convert GitHub Repo.
Comments: (You can also Comment directly to this discussions )